HMK's blog

保持思考|00后|等待


  • Home
  • Archive
  • Tags
  •   

© 2026 Hekang

Theme Typography by Makito

Proudly published with Hexo

KVM

Posted at 2026-01-23 虚拟化 

1.虚拟机软件KVM了解

1.1虚拟化基础

1.1.1 确保CPU支持KVM

1
2
3
4
5
6
7
[root@localhost ~]# egrep '(vmx|svm)' /proc/cpuinfo
flags : fpu vme de pse tsc msr pae mce cx8 apic sep mtrr pge mca cmov pat pse36 clflush mmx fxsr sse sse2 ss ht syscall nx pdpe1gb rdtscp lm constant_tsc arch_perfmon nopl xtopology tsc_reliable nonstop_tsc eagerfpu pni pclmulqdq vmx ssse3 fma cx16 pcid sse4_1 sse4_2 x2apic movbe popcnt tsc_deadline_timer aes xsave avx f16c rdrand hypervisor lahf_lm abm 3dnowprefetch invpcid_single ssbd ibrs ibpb stibp tpr_shadow vnmi ept vpid fsgsbase tsc_adjust bmi1 avx2 smep bmi2 invpcid rdseed adx smap clflushopt xsaveopt xsavec xgetbv1 arat md_clear spec_ctrl intel_stibp flush_l1d arch_capabilities
查看设备文件
# ls /dev/kvm

1.1.2 kvm工具包

1
2
3
4
5
6
7
8
9
10
11
12
13
14
15
16
17
18
19
20
21
22
qemu-kvm:
为kvm提供底层仿真支持
libvirt-daemon:
libvirtd守护进程,管理虚拟机
libvirt-client:
用户端软件,提供客户端管理命令
libvirt-daemon-driver-qemu:
libvirtd连接qemu 驱动
libvirt:
使用最多的KVM虚拟化管理工具和应用程序接口,通过libvirt调用KVM创建虚拟机
是KVM通过的访问API,其不但能管理KVM,还能管理VMWARE、Xen、Hyper-V、virtualBox等虚拟化方案
virt-manager:
图形化管理工具,其底层也是调用libvirt API来完成对虚拟机的操作,包括虚拟机的创建、删除、启动、停止以及一些简单的监控功能
virt-install:
虚拟机命令安装工具
virsh:
命令行工具是基于libvirt API创建的命令行工具,可以作为图形化的 virt-manager应用的备选工具。
virsh 命令可以被调用来创建虚拟化任务管理脚本,如安装、启动、停止虚拟机
virt-viewer:
通过VNC 和SPICE 协议显示虚拟机图形控制台的最小工具。该工具在其同名软件包中:virtviewer
cockpit:
Centos 和 Ubuntu 专门提供的基于Web的虚拟机管理页面

1.1.2.1libvirt 了解

libvirt 程序包是一个与虚拟机监控程序相独立的虚拟化应用程序接口,它可以与操作系统的一系列虚拟化性能进行交互

1
2
3
libvirt 程序包提供:
一个稳定的通用层,来安全的管理主机上的虚拟机
一个管理本地系统和联网主机的通用接口

功能定位:

	在虚拟机监控程序支持的情况下,部署、创建、修改、监测、控制、迁移以及停止虚拟机操作都需要这些API。尽管libvirt可同时访问多个主机,但API 只限于单节点操作。
				
	libvirt程序包被设计为用来构建高级管理工具和应用程序,例如virt-manager 与virsh命令行管理工具。libvirt主要的功能是管理单节点主机
	
,并提供API 来列举、监测和使用管理节点上的可用资源,其中包括CPU、内存、储存、网络和非一致性内存访问(NUMA)分区。管理工具可以位于独立于主机的物理机上,并通过安全协议和主机进行交流。

1.1.3 centos 安装kvm

1
2
3
4
5
6
7
8
9
10
11
12
13
14
15
16
17
18
19
20
21
22
23
24
25
26
27
28
29
30
31
32
# 准备依赖源
# yum install epel-release -y
# 安装软件
# 方法1
# yum groupinstall "Virtualization Host" # 不仅kvm 大全套
# 方法2
# yum install qemu-kvm libvirt virt-manager virt-install virt-viewer bridge-utils -y
# 启动服务
# systemctl enable --now libvirtd

[root@localhost ~]# ip a
1: lo: <LOOPBACK,UP,LOWER_UP> mtu 65536 qdisc noqueue state UNKNOWN group default qlen 1000
link/loopback 00:00:00:00:00:00 brd 00:00:00:00:00:00
inet 127.0.0.1/8 scope host lo
valid_lft forever preferred_lft forever
inet6 ::1/128 scope host
valid_lft forever preferred_lft forever
2: ens33: <BROADCAST,MULTICAST,UP,LOWER_UP> mtu 1500 qdisc pfifo_fast state UP group default qlen 1000
link/ether 00:0c:29:5b:1a:33 brd ff:ff:ff:ff:ff:ff
inet 192.168.11.11/24 brd 192.168.11.255 scope global noprefixroute ens33
valid_lft forever preferred_lft forever
inet6 fe80::20c:29ff:fe5b:1a33/64 scope link
valid_lft forever preferred_lft forever
3: virbr0: <NO-CARRIER,BROADCAST,MULTICAST,UP> mtu 1500 qdisc noqueue state DOWN group default qlen 1000
link/ether 52:54:00:b8:63:cb brd ff:ff:ff:ff:ff:ff
inet 192.168.122.1/24 brd 192.168.122.255 scope global virbr0
valid_lft forever preferred_lft forever
4: virbr0-nic: <BROADCAST,MULTICAST> mtu 1500 qdisc pfifo_fast master virbr0 state DOWN group default qlen 1000
link/ether 52:54:00:b8:63:cb brd ff:ff:ff:ff:ff:ff
[root@localhost ~]# brctl show
bridge name bridge id STP enabled interfaces
virbr0 8000.525400b863cb yes virbr0-nic

DNSmasq 是一款轻量级的网络服务工具,主要提供DNS缓存、DHCP服务、TFTP服务

1.1.4 Centos安装 cockpit [扩展]

1
2
3
4
# yum install cockpit cockpit-machines -y
# 默认情况下 该软件禁用了 root用户登录 (rocky)
# systemctl enable --now cockpit
# systemctl status cockpit

image​

image​

工具体系:

image​

虚拟机的管理有两套管理工具:

qemu: linux 内核支持的专用kvm管理工具

qemu-kvm	结合虚拟化软件qemu管理kvm虚拟机的集成工具集
			
qemu-img 	虚拟磁盘管理工具

1.1.5 配置体系结构

安装完kvm后,会有一个专用的目录结构

1
2
3
4
5
6
7
8
9
10
11
12
13
14
15
16
17
18
19
20
21
22
23
24
25
26
27
ls /etc/libvirt

[root@localhost ~]# ls /etc/libvirt/qemu/networks/
autostart default.xml


[root@localhost ~]# cat /etc/libvirt/qemu/networks/autostart/default.xml
<!--
WARNING: THIS IS AN AUTO-GENERATED FILE. CHANGES TO IT ARE LIKELY TO BE
OVERWRITTEN AND LOST. Changes to this xml configuration should be made using:
virsh net-edit default
or other application using the libvirt API.
-->

<network>
<name>default</name>
<uuid>1e5f91fd-6e5a-4bc9-887d-d3d9f8378352</uuid>
<forward mode='nat'/>
<bridge name='virbr0' stp='on' delay='0'/>
<mac address='52:54:00:b8:63:cb'/>
<ip address='192.168.122.1' netmask='255.255.255.0'>
<dhcp>
<range start='192.168.122.2' end='192.168.122.254'/>
</dhcp>
</ip>
</network>

virt-install 命令解读

1
2
3
4
5
6
7
8
9
10
11
12
13
14
15
16
17
18
19
20
21
22
23
24
25
26
27
28
29
30
31
32
33
34
35
36
37
38
39
40
41
42
43
44
45
46
47
48
49
50
51
52
53
54
55
56
57
58
59
60
61
62
63
64
65
66
67
68
69
70
71
72
73
74
75
76
77
78
79
80
81
82
83
84
85
86
87
88
89
90
91
92
93
94
95
96
97
98
99
100
101
102
103
104
105
106
107
108
109
110
111
112
113
114
115
116
117
118
119
120
121
122
123
124
125
126
127
128
129
130
131
132
133
134
135
136
137
138
139
140
141
142
143
144
145
146
147
148
149
150
151
152
153
154
155
156
157
158
159
160
[root@localhost ~]# virt-install --help
usage: virt-install --name NAME --memory MB STORAGE INSTALL [options]

Create a new virtual machine from specified install media.

optional arguments:
-h, --help show this help message and exit
--version show program's version number and exit
--connect URI Connect to hypervisor with libvirt URI

General Options:
-n NAME, --name NAME Name of the guest instance
--memory MEMORY Configure guest memory allocation. Ex:
--memory 1024 (in MiB)
--memory 512,maxmemory=1024
--memory 512,maxmemory=1024,hotplugmemorymax=2048,hotplugmemoryslots=2
--vcpus VCPUS Number of vcpus to configure for your guest. Ex:
--vcpus 5
--vcpus 5,maxvcpus=10,cpuset=1-4,6,8
--vcpus sockets=2,cores=4,threads=2
--cpu CPU CPU model and features. Ex:
--cpu coreduo,+x2apic
--cpu host-passthrough
--cpu host
--metadata METADATA Configure guest metadata. Ex:
--metadata name=foo,title="My pretty title",uuid=...
--metadata description="My nice long description"

Installation Method Options:
--cdrom CDROM CD-ROM installation media
-l LOCATION, --location LOCATION
Installation source (eg, nfs:host:/path,
http://host/path, ftp://host/path)
--pxe Boot from the network using the PXE protocol
--import Build guest around an existing disk image
--livecd Treat the CD-ROM media as a Live CD
-x EXTRA_ARGS, --extra-args EXTRA_ARGS
Additional arguments to pass to the install kernel
booted from --location
--initrd-inject INITRD_INJECT
Add given file to root of initrd from --location
--os-variant DISTRO_VARIANT
The OS variant being installed guests, e.g.
'fedora18', 'rhel6', 'winxp', etc.
--boot BOOT Configure guest boot settings. Ex:
--boot hd,cdrom,menu=on
--boot init=/sbin/init (for containers)
--idmap IDMAP Enable user namespace for LXC container. Ex:
--idmap uid_start=0,uid_target=1000,uid_count=10

Device Options:
--disk DISK Specify storage with various options. Ex.
--disk size=10 (new 10GiB image in default location)
--disk /my/existing/disk,cache=none
--disk device=cdrom,bus=scsi
--disk=?
-w NETWORK, --network NETWORK
Configure a guest network interface. Ex:
--network bridge=mybr0
--network network=my_libvirt_virtual_net
--network network=mynet,model=virtio,mac=00:11...
--network none
--network help
--graphics GRAPHICS Configure guest display settings. Ex:
--graphics vnc
--graphics spice,port=5901,tlsport=5902
--graphics none
--graphics vnc,password=foobar,port=5910,keymap=ja
--controller CONTROLLER
Configure a guest controller device. Ex:
--controller type=usb,model=ich9-ehci1
--input INPUT Configure a guest input device. Ex:
--input tablet
--input keyboard,bus=usb
--serial SERIAL Configure a guest serial device
--parallel PARALLEL Configure a guest parallel device
--channel CHANNEL Configure a guest communication channel
--console CONSOLE Configure a text console connection between the guest
and host
--hostdev HOSTDEV Configure physical USB/PCI/etc host devices to be
shared with the guest
--filesystem FILESYSTEM
Pass host directory to the guest. Ex:
--filesystem /my/source/dir,/dir/in/guest
--filesystem template_name,/,type=template
--sound [SOUND] Configure guest sound device emulation
--watchdog WATCHDOG Configure a guest watchdog device
--video VIDEO Configure guest video hardware.
--smartcard SMARTCARD
Configure a guest smartcard device. Ex:
--smartcard mode=passthrough
--redirdev REDIRDEV Configure a guest redirection device. Ex:
--redirdev usb,type=tcp,server=192.168.1.1:4000
--memballoon MEMBALLOON
Configure a guest memballoon device. Ex:
--memballoon model=virtio
--tpm TPM Configure a guest TPM device. Ex:
--tpm /dev/tpm
--rng RNG Configure a guest RNG device. Ex:
--rng /dev/urandom
--panic PANIC Configure a guest panic device. Ex:
--panic default
--memdev MEMDEV Configure a guest memory device. Ex:
--memdev dimm,target_size=1024

Guest Configuration Options:
--security SECURITY Set domain security driver configuration.
--cputune CPUTUNE Tune CPU parameters for the domain process.
--numatune NUMATUNE Tune NUMA policy for the domain process.
--memtune MEMTUNE Tune memory policy for the domain process.
--blkiotune BLKIOTUNE
Tune blkio policy for the domain process.
--memorybacking MEMORYBACKING
Set memory backing policy for the domain process. Ex:
--memorybacking hugepages=on
--features FEATURES Set domain <features> XML. Ex:
--features acpi=off
--features apic=on,eoi=on
--clock CLOCK Set domain <clock> XML. Ex:
--clock offset=localtime,rtc_tickpolicy=catchup
--pm PM Configure VM power management features
--events EVENTS Configure VM lifecycle management policy
--resource RESOURCE Configure VM resource partitioning (cgroups)
--sysinfo SYSINFO Configure SMBIOS System Information. Ex:
--sysinfo emulate
--sysinfo host
--sysinfo bios_vendor=Vendor_Inc.,bios_version=1.2.3-abc,...
--sysinfo system_manufacturer=System_Corp.,system_product=Computer,...
--sysinfo baseBoard_manufacturer=Baseboard_Corp.,baseBoard_product=Motherboard,...
--qemu-commandline QEMU_COMMANDLINE
Pass arguments directly to the qemu emulator. Ex:
--qemu-commandline='-display gtk,gl=on'
--qemu-commandline env=DISPLAY=:0.1

Virtualization Platform Options:
-v, --hvm This guest should be a fully virtualized guest
-p, --paravirt This guest should be a paravirtualized guest
--container This guest should be a container guest
--virt-type HV_TYPE Hypervisor name to use (kvm, qemu, xen, ...)
--arch ARCH The CPU architecture to simulate
--machine MACHINE The machine type to emulate

Miscellaneous Options:
--autostart Have domain autostart on host boot up.
--transient Create a transient domain.
--wait WAIT Minutes to wait for install to complete.
--noautoconsole Don't automatically try to connect to the guest
console
--noreboot Don't boot guest after completing install.
--print-xml [XMLONLY]
Print the generated domain XML rather than create the
guest.
--dry-run Run through install process, but do not create devices
or define the guest.
--check CHECK Enable or disable validation checks. Example:
--check path_in_use=off
--check all=off
-q, --quiet Suppress non-error output
-d, --debug Print debugging information

创建虚拟机

1
2
3
4
5
6
7
8
9
10
11
12
13
14
15
16
17
18
19
20
21
22
23
[root@kvm1 ~]# virt-install \
--virt-type kvm \
--name testkvm \
--memory 1024 \
--cdrom=/root/CentOS-7-x86_64-Minimal-2009.iso \
--disk=/opt/centos7minimal.raw \
--network network=default \
--graphics vnc,listen=0.0.0.0 \
--noautoconsole

[root@kvm1 ~]# virt-install --virt-type kvm --name testkvm --memory 1024 --vcpu 1 --cdrom=/data/images/CentOS-7-x86_64-Minimal-2009.iso --disk=/opt/centosminimal.raw --network network=default --graphics vnc,listen=0.0.0.0 --noautoconsole
WARNING No operating system detected, VM performance may suffer. Specify an OS with --os-variant for optimal results.

# 磁盘可以手动创建好
# qemu-img create -f raw /opt/centosminimal.raw 10G

# 无需创建系统盘
virt-install --virt-type kvm --os-variant=centos7 --name centos7 --memory 1024 --vpus 1 \
--cdrom=/data/images/Centos-7-Minimal-2009.iso \
--disk path=/opt/centos7_test.qcow2,size=10,format=qcow2,bus=virtio \
--network network=default \
--graphics vnc,listen=0.0.0.0 \
--noautoconsole

vnc中虚拟机是不会重启的,需要在宿主机系统中使用命令开机

virsh start vm_id/name

1
2
3
4
5
6
7
8
9
10
11
12
13
14
15
16
17
18
19
20
21
22
23
24
25
26
27
28
29
30
31
32
33
34
35
36
37
38
39
40
41
42
43
44
45
46
47
48
49
50
51
52
53
54
55
56
57
58
59
60
61
62
63
64
65
66
67
68
69
70
71
72
73
74
75
76
77
78
79
80
81
82
83
84
85
86
87
88
89
90
91
92
93
94
95
96
97
98
99
100
101
102
103
104
105
106
107
108
109
110
111
112
113
114
115
116
117
118
119
120
121
122
123
124
125
126
127
128
129
130
131
132
133
134
135
136
137
138
139
140
141
142
143
144
145
146
147
148
149
150
151
152
153
154
155
156
157
158
159
160
161
162
163
164
165
166
167
168
169
170
171
172
173
174
175
176
177
178
179
180
181
182
183
184
185
186
187
188
189
190
191
192
193
194
195
196
197
198
199
200
201
202
203
204
205
206
207
208
209
210
211
212
213
214
215
216
217
218
219
220
221
222
223
224
225
226
227
228
229
230
231
232
233
234
235
236
237
238
239
240
241
242
243
244
245
246
247
248
249
250
251
252
253
254
255
256
257
258
259
260
261
262
263
264
265
266
267
268
269
270
271
272
273
274
275
276
277
278
279
280
281
282
283
284
285
286
287
288
289
290
291
292
293
294
[root@kvm1 ~]# virsh --help

virsh [options]... [<command_string>]
virsh [options]... <command> [args...]

options:
-c | --connect=URI hypervisor connection URI
-d | --debug=NUM debug level [0-4]
-e | --escape <char> set escape sequence for console
-h | --help this help
-k | --keepalive-interval=NUM
keepalive interval in seconds, 0 for disable
-K | --keepalive-count=NUM
number of possible missed keepalive messages
-l | --log=FILE output logging to file
-q | --quiet quiet mode
-r | --readonly connect readonly
-t | --timing print timing information
-v short version
-V long version
--version[=TYPE] version, TYPE is short or long (default short)
commands (non interactive mode):

Domain Management (help keyword 'domain')
attach-device attach device from an XML file
attach-disk attach disk device
attach-interface attach network interface
autostart autostart a domain
blkdeviotune Set or query a block device I/O tuning parameters.
blkiotune Get or set blkio parameters
blockcommit Start a block commit operation.
blockcopy Start a block copy operation.
blockjob Manage active block operations
blockpull Populate a disk from its backing image.
blockresize Resize block device of domain.
change-media Change media of CD or floppy drive
console connect to the guest console
cpu-stats show domain cpu statistics
create create a domain from an XML file
define define (but don't start) a domain from an XML file
desc show or set domain's description or title
destroy destroy (stop) a domain
detach-device detach device from an XML file
detach-device-alias detach device from an alias
detach-disk detach disk device
detach-interface detach network interface
domdisplay domain display connection URI
domfsfreeze Freeze domain's mounted filesystems.
domfsthaw Thaw domain's mounted filesystems.
domfsinfo Get information of domain's mounted filesystems.
domfstrim Invoke fstrim on domain's mounted filesystems.
domhostname print the domain's hostname
domid convert a domain name or UUID to domain id
domif-setlink set link state of a virtual interface
domiftune get/set parameters of a virtual interface
domjobabort abort active domain job
domjobinfo domain job information
domname convert a domain id or UUID to domain name
domrename rename a domain
dompmsuspend suspend a domain gracefully using power management functions
dompmwakeup wakeup a domain from pmsuspended state
domuuid convert a domain name or id to domain UUID
domxml-from-native Convert native config to domain XML
domxml-to-native Convert domain XML to native config
dump dump the core of a domain to a file for analysis
dumpxml domain information in XML
edit edit XML configuration for a domain
event Domain Events
inject-nmi Inject NMI to the guest
iothreadinfo view domain IOThreads
iothreadpin control domain IOThread affinity
iothreadadd add an IOThread to the guest domain
iothreaddel delete an IOThread from the guest domain
send-key Send keycodes to the guest
send-process-signal Send signals to processes
lxc-enter-namespace LXC Guest Enter Namespace
managedsave managed save of a domain state
managedsave-remove Remove managed save of a domain
managedsave-edit edit XML for a domain's managed save state file
managedsave-dumpxml Domain information of managed save state file in XML
managedsave-define redefine the XML for a domain's managed save state file
memtune Get or set memory parameters
perf Get or set perf event
metadata show or set domain's custom XML metadata
migrate migrate domain to another host
migrate-setmaxdowntime set maximum tolerable downtime
migrate-getmaxdowntime get maximum tolerable downtime
migrate-compcache get/set compression cache size
migrate-setspeed Set the maximum migration bandwidth
migrate-getspeed Get the maximum migration bandwidth
migrate-postcopy Switch running migration from pre-copy to post-copy
numatune Get or set numa parameters
qemu-attach QEMU Attach
qemu-monitor-command QEMU Monitor Command
qemu-monitor-event QEMU Monitor Events
qemu-agent-command QEMU Guest Agent Command
reboot reboot a domain
reset reset a domain
restore restore a domain from a saved state in a file
resume resume a domain
save save a domain state to a file
save-image-define redefine the XML for a domain's saved state file
save-image-dumpxml saved state domain information in XML
save-image-edit edit XML for a domain's saved state file
schedinfo show/set scheduler parameters
screenshot take a screenshot of a current domain console and store it into a file
set-lifecycle-action change lifecycle actions
set-user-password set the user password inside the domain
setmaxmem change maximum memory limit
setmem change memory allocation
setvcpus change number of virtual CPUs
shutdown gracefully shutdown a domain
start start a (previously defined) inactive domain
suspend suspend a domain
ttyconsole tty console
undefine undefine a domain
update-device update device from an XML file
vcpucount domain vcpu counts
vcpuinfo detailed domain vcpu information
vcpupin control or query domain vcpu affinity
emulatorpin control or query domain emulator affinity
vncdisplay vnc display
guestvcpus query or modify state of vcpu in the guest (via agent)
setvcpu attach/detach vcpu or groups of threads
domblkthreshold set the threshold for block-threshold event for a given block device or it's backing chain element

Domain Monitoring (help keyword 'monitor')
domblkerror Show errors on block devices
domblkinfo domain block device size information
domblklist list all domain blocks
domblkstat get device block stats for a domain
domcontrol domain control interface state
domif-getlink get link state of a virtual interface
domifaddr Get network interfaces' addresses for a running domain
domiflist list all domain virtual interfaces
domifstat get network interface stats for a domain
dominfo domain information
dommemstat get memory statistics for a domain
domstate domain state
domstats get statistics about one or multiple domains
domtime domain time
list list domains

Host and Hypervisor (help keyword 'host')
allocpages Manipulate pages pool size
capabilities capabilities
cpu-baseline compute baseline CPU
cpu-compare compare host CPU with a CPU described by an XML file
cpu-models CPU models
domcapabilities domain capabilities
freecell NUMA free memory
freepages NUMA free pages
hostname print the hypervisor hostname
hypervisor-cpu-baseline compute baseline CPU usable by a specific hypervisor
hypervisor-cpu-compare compare a CPU with the CPU created by a hypervisor on the host
maxvcpus connection vcpu maximum
node-memory-tune Get or set node memory parameters
nodecpumap node cpu map
nodecpustats Prints cpu stats of the node.
nodeinfo node information
nodememstats Prints memory stats of the node.
nodesuspend suspend the host node for a given time duration
sysinfo print the hypervisor sysinfo
uri print the hypervisor canonical URI
version show version

Interface (help keyword 'interface')
iface-begin create a snapshot of current interfaces settings, which can be later committed (iface-commit) or restored (iface-rollback)
iface-bridge create a bridge device and attach an existing network device to it
iface-commit commit changes made since iface-begin and free restore point
iface-define define an inactive persistent physical host interface or modify an existing persistent one from an XML file
iface-destroy destroy a physical host interface (disable it / "if-down")
iface-dumpxml interface information in XML
iface-edit edit XML configuration for a physical host interface
iface-list list physical host interfaces
iface-mac convert an interface name to interface MAC address
iface-name convert an interface MAC address to interface name
iface-rollback rollback to previous saved configuration created via iface-begin
iface-start start a physical host interface (enable it / "if-up")
iface-unbridge undefine a bridge device after detaching its slave device
iface-undefine undefine a physical host interface (remove it from configuration)

Network Filter (help keyword 'filter')
nwfilter-define define or update a network filter from an XML file
nwfilter-dumpxml network filter information in XML
nwfilter-edit edit XML configuration for a network filter
nwfilter-list list network filters
nwfilter-undefine undefine a network filter
nwfilter-binding-create create a network filter binding from an XML file
nwfilter-binding-delete delete a network filter binding
nwfilter-binding-dumpxml network filter information in XML
nwfilter-binding-list list network filter bindings

Networking (help keyword 'network')
net-autostart autostart a network
net-create create a network from an XML file
net-define define an inactive persistent virtual network or modify an existing persistent one from an XML file
net-destroy destroy (stop) a network
net-dhcp-leases print lease info for a given network
net-dumpxml network information in XML
net-edit edit XML configuration for a network
net-event Network Events
net-info network information
net-list list networks
net-name convert a network UUID to network name
net-start start a (previously defined) inactive network
net-undefine undefine a persistent network
net-update update parts of an existing network's configuration
net-uuid convert a network name to network UUID

Node Device (help keyword 'nodedev')
nodedev-create create a device defined by an XML file on the node
nodedev-destroy destroy (stop) a device on the node
nodedev-detach detach node device from its device driver
nodedev-dumpxml node device details in XML
nodedev-list enumerate devices on this host
nodedev-reattach reattach node device to its device driver
nodedev-reset reset node device
nodedev-event Node Device Events

Secret (help keyword 'secret')
secret-define define or modify a secret from an XML file
secret-dumpxml secret attributes in XML
secret-event Secret Events
secret-get-value Output a secret value
secret-list list secrets
secret-set-value set a secret value
secret-undefine undefine a secret

Snapshot (help keyword 'snapshot')
snapshot-create Create a snapshot from XML
snapshot-create-as Create a snapshot from a set of args
snapshot-current Get or set the current snapshot
snapshot-delete Delete a domain snapshot
snapshot-dumpxml Dump XML for a domain snapshot
snapshot-edit edit XML for a snapshot
snapshot-info snapshot information
snapshot-list List snapshots for a domain
snapshot-parent Get the name of the parent of a snapshot
snapshot-revert Revert a domain to a snapshot

Storage Pool (help keyword 'pool')
find-storage-pool-sources-as find potential storage pool sources
find-storage-pool-sources discover potential storage pool sources
pool-autostart autostart a pool
pool-build build a pool
pool-create-as create a pool from a set of args
pool-create create a pool from an XML file
pool-define-as define a pool from a set of args
pool-define define an inactive persistent storage pool or modify an existing persistent one from an XML file
pool-delete delete a pool
pool-destroy destroy (stop) a pool
pool-dumpxml pool information in XML
pool-edit edit XML configuration for a storage pool
pool-info storage pool information
pool-list list pools
pool-name convert a pool UUID to pool name
pool-refresh refresh a pool
pool-start start a (previously defined) inactive pool
pool-undefine undefine an inactive pool
pool-uuid convert a pool name to pool UUID
pool-event Storage Pool Events

Storage Volume (help keyword 'volume')
vol-clone clone a volume.
vol-create-as create a volume from a set of args
vol-create create a vol from an XML file
vol-create-from create a vol, using another volume as input
vol-delete delete a vol
vol-download download volume contents to a file
vol-dumpxml vol information in XML
vol-info storage vol information
vol-key returns the volume key for a given volume name or path
vol-list list vols
vol-name returns the volume name for a given volume key or path
vol-path returns the volume path for a given volume name or key
vol-pool returns the storage pool for a given volume key or path
vol-resize resize a vol
vol-upload upload file contents to a volume
vol-wipe wipe a vol

Virsh itself (help keyword 'virsh')
cd change the current directory
echo echo arguments
exit quit this interactive terminal
help print help
pwd print the current directory
quit quit this interactive terminal
connect (re)connect to hypervisor


(specify help <group> for details about the commands in the group)

(specify help <command> for details about the command)

virsh list 列出所有活动的虚拟机

virsh list –all 列出所有活动和不活动的虚拟机

virsh list –transient 列出所有临时的虚拟机

virsh list –persistent 列出所有永久的虚拟机

1.1.6 创建

创建虚拟机的方式除了初始方法,还有一种经常使用的方法-使用配置文件,而使用配置文件,会有两种方式

临时创建
- 借助于现成的配置文件和之前创建的虚拟机数据,创建一个新虚拟机,他会自动清除

- 步骤: 配置文件-创建虚拟机-查看
			
- 命令: virsh create file_name.xml

cp centos.xml centos1.xml

修改 name uuid

virsh create centos1.xml # centos需要关机 centos1使用centos的系统盘

正规创建:

- 借助于现成的配置文件在虚拟机管理程序中注册一个新的虚拟机,他不会自动清除
			
- 步骤: 配置文件-创建虚拟机-查看
			
- 命令: virsh define file_name.xml

cp centos.xml centos2.xml

修改 name uuid

virsh define centos2.xml

关键点:

尽量拷贝一个完整的虚拟机配置文件,然后修改配置文件中的名字,这个配置文件中的name属性要一致,且名字唯一

1.1.7 登录

virsh domdisplay testkvm # 获取虚拟机地址信息

[root@kvm1 ~]# virsh domdisplay testkvm
vnc://localhost:0

1.1.8 console登录

默认情况下新安装的虚拟机是无法通过virsh console 命令连入虚拟机的

需要开启console 功能。可以通过grubby 来配置grub 信息

使用 vnc 登录到虚拟机 添加ttyS0的许可,然后重启虚拟机

grubby –update-kernel=ALL –args=”console=ttyS0”

reboot

登录

[root@kvm1 ~]# virsh console 1
Connected to domain testkvm
Escape character is ^]

CentOS Linux 7 (Core)
Kernel 3.10.0-1160.el7.x86_64 on an x86_64

localhost login:

挂起 虚拟机

virsh suspend 1

virsh resume 1

1.1.9 删除

正常删除 不影响当前运行状态

删除其配置文件, virsh 状态表中依然存在,关闭虚拟机后,状态表中亦删除

命令格式: virsh undefine 虚拟机名称

删除虚拟机

virsh list –all

virsh dumpxml vm_name > centosbak.xml

VirtIO 控制台驱动:

支持虚拟机与宿主机的控制台交互(类似串口通信)

在kvm中部署windows主机时,几乎都会使用VirtIO驱动,需在安装系统时手动加载,否则会面临性能瓶颈或设备无法识别

桥接方式创建VM 【扩展】

使用桥接方式创建VM,需要提前保证存在桥接网卡的,否则下面的命令无法执行

virt-install –virt-type kvm –os-variant=centos7 –name centos7 –memory 1024 –vpus 1
–cdrom=/data/images/Centos-7-Minimal-2009.iso
–disk path=/opt/centos7_test.qcow2,size=10,format=qcow2,bus=virtio
–network network=bridge:virb1,model=virtio
–graphics vnc,listen=0.0.0.0
–noautoconsole

2.核心知识

2.1 存储管理

基础知识:

	为了使虚拟机获得更强大的后端存储能力,libvirt 提供了对各种各样的存储介质支持,包括本地文件系统,网络文件系统,iSSCI,LVM等多种后端存储系统。在虚拟机中主要以存储池(pool)与存储卷(volume)的形式存在。
				
	libvirt中的存储管理独立于虚拟机管理。也就是存储池和存储卷的操作独立于虚拟机的操作存在,即使是没有虚拟机的场景。工作中我们可以当虚拟机需要存储资源时再进行灵活使用。

存储池:

	KVM平台以存储池的形式对存储进行统一管理。它可以理解为一种映射关系,即将宿主机上的存储空间形成可被KVM使用的逻辑存储池,以方便虚拟主机存储资源进行统一管理。
				
	宿主机的存储空间,可以是本地的、网络的等kvm支持的任意形式。

‍

默认KVM将这些存储池的配置文件放在/etc/libvirt/storage 因为在创建虚拟机的时候,涉及到两个目录,所以这两个目录在虚拟机创建的时候就存在了

‍

通过virsh 中 pool 命令能够查看、创建、激活、注册、删除存储池

virsh --help | grep pool

2.1.1 基本操作

信息查看

存储列表: virsh pool-list

其他信息:virsh pool-info pool_name

创建存储池:

常见的两种创建方法,基于文件夹和文件系统,主要介绍文件夹

定义永久池+ 创建池: virsh pool-define-as + virsh pool-build
			
创建临时池+启动池: virsh pool-create-as

‍

关闭

virsh pool-destroy hmk_pool

1
2
3
4
5
6
命令格式一:
virsh pool-define-as vmware_pool --type dir --target /kvm/images
注释:
vmware_pool 定义的存储池名称
--type dir 定义的类型是dir
--target 存储池在宿主机上的目录是/kvm/images
1
2
3
4
5
6
7
8
9
10
11
12
13
14
15
16
其他创建命令:

基于分区创建存储池:
virsh pool-define-as <存储池名> fs --source-dev <分区名> --target <挂载目录>

基于磁盘创建存储池:
virsh pool-define-as <存储池名> disk --source-dev <磁盘名> --source-format gpt --target <挂载目录>

基于lvm创建存储池
virsh pool-define-as <存储池名> logical --source-name <vg名> --target <挂载目录>

基于iscsi创建存储池:
virsh pool-define-as <存储池名> iscsi --source-host <存储主机ip> --source-dev <存储目标> --target <挂载目录>

基于nfs创建存储池:
virsh pool-define-as <存储池名> netfs --source-host <nfs主机ip> --source-path <nfs共享目录> --target <挂载目录>

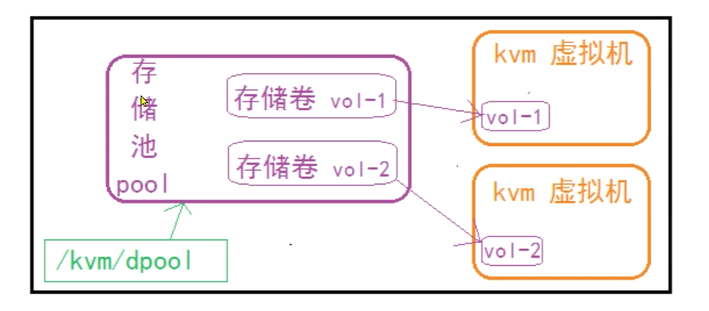
[root@kvm1 storage]# virsh pool-define-as hmk_pool –type dir –target /kvm/images
Pool hmk_pool defined
[root@kvm1 storage]# virsh pool-build hmk_pool
Pool hmk_pool built

[root@kvm1 storage]# virsh pool-list –all
Name State Autostart

default active yes
hmk_pool inactive no
images active yes
opt active yes
root active yes

取消存储池

取消存储池目录

virsh pool-delete hmk_pool

删除存储配置文件

virsh pool-undefine hmk_pool

[root@kvm1 ~]# virsh pool-destroy hmk_pool
Pool hmk_pool destroyed

[root@kvm1 ~]# virsh pool-delete hmk_pool
Pool hmk_pool deleted

[root@kvm1 ~]#
[root@kvm1 ~]# virsh pool-undefine hmk_pool
Pool hmk_pool has been undefined

2.1.2存储卷

存储卷是一种可以分配给虚拟机使用的存储设备。在虚拟机中与一个挂载点对应,而物理上可以是一个虚拟机磁盘文件,或者一个真实的磁盘文件。它一般放在一个专用的存储池中来使用。

image​

存储卷结合存储池来使用,所以我们就先来做存储卷的准备工作,创建存储池

命令解析:

[root@kvm1 ~]# virsh –help | grep vol
Storage Volume (help keyword ‘volume’)
vol-clone clone a volume.
vol-create-as create a volume from a set of args
vol-create create a vol from an XML file
vol-create-from create a vol, using another volume as input
vol-delete delete a vol
vol-download download volume contents to a file
vol-dumpxml vol information in XML
vol-info storage vol information
vol-key returns the volume key for a given volume name or path
vol-list list vols
vol-name returns the volume name for a given volume key or path
vol-path returns the volume path for a given volume name or key
vol-pool returns the storage pool for a given volume key or path
vol-resize resize a vol
vol-upload upload file contents to a volume
vol-wipe wipe a vol

简单操作

创建存储卷

[root@kvm1 storage]# virsh vol-create-as –pool hmk_pool –name hmktest.img –capacity 2G –allocation 1G –format raw
Vol hmktest.img created

删除存储卷

[root@kvm1 ~]# virsh vol-delete hmktest.img –pool hmk_pool
Vol hmktest.img deleted

[root@kvm1 storage]# virsh vol-info hmktest.img hmk_pool
Name: hmktest.img
Type: file
Capacity: 2.00 GiB
Allocation: 1.00 GiB

查看配置

[root@kvm1 storage]# virsh vol-dumpxml hmktest.img hmk_pool

hmktest.img
/kvm/images/hmktest.img


2147483648
1073741824
2147483648

/kvm/images/hmktest.img


0600
0
0


1768990919.755089884
1768990861.701088484
1768990861.701088484


挂载、卸载

挂载动作:

virsh attach-disk <虚拟机> <存储卷> <挂载设备>
			
注意:挂载设备可以是vdx 或者sdx

卸载动作:

virsh detach-disk <虚拟机><挂载设备>
			
注意:挂载格式可以是 vdx  或者sdx

磁盘的挂载和卸载操作依赖于运行中的虚拟机

1
2
3
4
5
6
7
8
9
10
11
12
13
14
15
16
17
18
19
20
21
22
23
24
25
26
27
28
29
30
31
32
33
34
35
36
37
38
39
40
41
42
43
44
45
46
47
48
49
50
51
52
53
54
55
56
57
58
59
60
61
# 挂载
[root@kvm1 images]# virsh attach-disk testkvm /kvm/images/hmktest.img sdb
Disk attached successfully

[root@localhost ~]# fdisk -l
Disk /dev/sda: 5368 MB, 5368709120 bytes, 10485760 sectors
Units = sectors of 1 * 512 = 512 bytes
Sector size (logical/physical): 512 bytes / 512 bytes
I/O size (minimum/optimal): 512 bytes / 512 bytes
Disk label type: dos
Disk identifier: 0x000b017c

Device Boot Start End Blocks Id System
/dev/sda1 * 2048 2099199 1048576 83 Linux
/dev/sda2 2099200 10485759 4193280 8e Linux LVM

Disk /dev/mapper/centos-root: 3753 MB, 3753902080 bytes, 7331840 sectors
Units = sectors of 1 * 512 = 512 bytes
Sector size (logical/physical): 512 bytes / 512 bytes
I/O size (minimum/optimal): 512 bytes / 512 bytes

Disk /dev/mapper/centos-swap: 536 MB, 536870912 bytes, 1048576 sectors
Units = sectors of 1 * 512 = 512 bytes
Sector size (logical/physical): 512 bytes / 512 bytes
I/O size (minimum/optimal): 512 bytes / 512 bytes

Disk /dev/sdb: 2147 MB, 2147483648 bytes, 4194304 sectors
Units = sectors of 1 * 512 = 512 bytes
Sector size (logical/physical): 512 bytes / 512 bytes
I/O size (minimum/optimal): 512 bytes / 512 bytes

# 格式化
[root@localhost ~]# mkfs.ext4 /dev/sdb
mke2fs 1.42.9 (28-Dec-2013)
/dev/sdb is entire device, not just one partition!
Proceed anyway? (y,n) y
Discarding device blocks: done
Filesystem label=
OS type: Linux
Block size=4096 (log=2)
Fragment size=4096 (log=2)
Stride=0 blocks, Stripe width=0 blocks
131072 inodes, 524288 blocks
26214 blocks (5.00%) reserved for the super user
First data block=0
Maximum filesystem blocks=536870912
16 block groups
32768 blocks per group, 32768 fragments per group
8192 inodes per group
Superblock backups stored on blocks:
32768, 98304, 163840, 229376, 294912

Allocating group tables: done
Writing inode tables: done
Creating journal (16384 blocks): done
Writing superblocks and filesystem accounting information: done

[root@localhost ~]# dd if=/dev/zero of=/hmk/test.txt bs=1M count=200
200+0 records in
200+0 records out
209715200 bytes (210 MB) copied, 2.30002 s, 91.2 MB/s
1
2
# 卸载磁盘
[root@localhost ~]# umount /hmk
1
2
[root@kvm1 images]# virsh detach-disk testkvm sdb
Disk detached successfully

扩展

数据导出:

virsh vol-download <存储卷名称> <导出文件名> --pool <存储池>

数据清除

virsh vol-wipe <存储卷名称> --pool <存储池>

容量变动

将卷扩展到 100GB
			
	virsh vol-resize my-vm.qcow2 100G --pool default
			
在当前基础上增加 20GB(使用 --delta)
			
	virsh vol-resize my-vm.qcow2 20G --pool default --delta
			
缩容到 50GB(必须加 --shrink 参数)
			
	virsh vol-resize my-vm.qcow2 50G --pool default --shrink

生产环境建议:

  • 对运行中的虚拟机:使用 virsh blockresize​ 实现热扩容
  • 操作前:务必快照/备份
  • 扩容后:需在虚拟机内部扩展分区/文件系统
  • 缩容前:必须先在虚拟机内部缩小文件系统和分区

2.2 网络管理

网络模型 :

kvm类型的虚拟机,默认情况下使用NAT网络,同一网络模型下创建的多虚拟机之间可以彼此通信,这种网络模型与外界网络进行通信依赖于nat服务,nat服务正常,该模型网络是通过数据包的转换来达到通信的效果的,在网络流量比较大的场景下,该模式会成为虚拟机的瓶颈。
			
生产中我们一般采用桥接的网络模型,这种模型是借助于宿主机的网卡设备,直接与外界通信,效果很好。

image​

imageimage​

image​

image​

image​

2.2.1 配置流程

前提:保证宿主机网络正常,网络服务使用network

生成新的桥接设备

关联桥设备和物理网卡设备

清空物理网卡地址,启用桥设备地址,设置网络网关为桥设备地址

虚拟机使用桥设备

命令:

vrish net-list

‍

[root@kvm1 networks]# virsh net-info default
Name: default
UUID: 1e5f91fd-6e5a-4bc9-887d-d3d9f8378352
Active: yes
Persistent: yes
Autostart: yes
Bridge: virbr0

‍

[root@kvm1 networks]# virsh net-dumpxml default

default
1e5f91fd-6e5a-4bc9-887d-d3d9f8378352


2.2.2 基础知识

创建网络

临时:virsh net-create <xml配置文件>
			
永久:virsh net-define <xml配置文件>

‍

关闭网络

virsh net-destroy <网络名称>

开启网络

virsh net-start <网络名称>

删除网络

virsh net-undefine <网络名称> # 永久 配置文件也会删除

2.2.3 自定义网络

手工实践

brctl add br0

brctl stp br0 on

brctl show

ifconfig ens33 0 up

关联桥接设备和物理网卡

brctl addif br0 ens33

配置桥接网卡ip地址并启动

ifconfig br0 192.168.11.11/24 up

桥接网卡配置路由

route add default gw 192.168.11.2

‍

1
2
3
4
5
6
7
8
9
10
11
12
13
14
15
16
17
18
19
20
21
22
23
24
25
26
27
[root@kvm1 ~]# ip a
1: lo: <LOOPBACK,UP,LOWER_UP> mtu 65536 qdisc noqueue state UNKNOWN group default qlen 1000
link/loopback 00:00:00:00:00:00 brd 00:00:00:00:00:00
inet 127.0.0.1/8 scope host lo
valid_lft forever preferred_lft forever
inet6 ::1/128 scope host
valid_lft forever preferred_lft forever
2: ens33: <BROADCAST,MULTICAST,UP,LOWER_UP> mtu 1500 qdisc pfifo_fast master br0 state UP group default qlen 1000
link/ether 00:0c:29:5b:1a:33 brd ff:ff:ff:ff:ff:ff
inet6 fe80::20c:29ff:fe5b:1a33/64 scope link
valid_lft forever preferred_lft forever
3: virbr0: <NO-CARRIER,BROADCAST,MULTICAST,UP> mtu 1500 qdisc noqueue state DOWN group default qlen 1000
link/ether 52:54:00:b8:63:cb brd ff:ff:ff:ff:ff:ff
inet 192.168.122.1/24 brd 192.168.122.255 scope global virbr0
valid_lft forever preferred_lft forever
4: virbr0-nic: <BROADCAST,MULTICAST> mtu 1500 qdisc pfifo_fast master virbr0 state DOWN group default qlen 1000
link/ether 52:54:00:b8:63:cb brd ff:ff:ff:ff:ff:ff
6: br0: <BROADCAST,MULTICAST,UP,LOWER_UP> mtu 1500 qdisc noqueue state UP group default qlen 1000
link/ether 00:0c:29:5b:1a:33 brd ff:ff:ff:ff:ff:ff
inet 192.168.11.11/24 brd 192.168.11.255 scope global br0
valid_lft forever preferred_lft forever
inet6 fe80::20c:29ff:fe5b:1a33/64 scope link
valid_lft forever preferred_lft forever
[root@kvm1 ~]# brctl show
bridge name bridge id STP enabled interfaces
br0 8000.000c295b1a33 yes ens33
virbr0 8000.525400b863cb yes virbr0-nic

testkvm 使用桥接网络

修改xml文件

修改default network

‍

或者 virsh edit testkvm

‍

[root@kvm1 qemu]# virsh console 4
连接到域 testkvm
换码符为 ^]

CentOS Linux 7 (Core)
Kernel 3.10.0-1160.el7.x86_64 on an x86_64

bogon login: root
Password:
Last login: Thu Jan 22 02:13:54 on ttyS0
[root@bogon ~]# ip a
1: lo: <LOOPBACK,UP,LOWER_UP> mtu 65536 qdisc noqueue state UNKNOWN group default qlen 1000
link/loopback 00:00:00:00:00:00 brd 00:00:00:00:00:00
inet 127.0.0.1/8 scope host lo
valid_lft forever preferred_lft forever
inet6 ::1/128 scope host
valid_lft forever preferred_lft forever
2: ens3: <BROADCAST,MULTICAST,UP,LOWER_UP> mtu 1500 qdisc pfifo_fast state UP group default qlen 1000
link/ether 52:54:00:23:8a:38 brd ff:ff:ff:ff:ff:ff
inet 192.168.11.129/24 brd 192.168.11.255 scope global noprefixroute dynamic ens3
valid_lft 1448sec preferred_lft 1448sec
inet6 fe80::2444:29e5:fd3d:d98/64 scope link noprefixroute
valid_lft forever preferred_lft forever

以桥接模式创建虚拟机

virt-install –virt-type kvm –os-variant=centos7 –name

testkvm2 –memory 1024 –vcpus 1 –cdrom=/kvm/images/CentOS-7-x86_64-Minimal-

2009.iso –disk path=/opt/CentOS-7-x86_64.qcow2,size=10,format=qcow2,bus=virtio -

-network network=bridge:br0,model=virtio –graphics vnc,listen=0.0.0.0 –

noautoconsole

[root@kvm1 images]# brctl show
bridge name bridge id STP enabled interfaces
br0 8000.000c295b1a33 yes ens33
vnet0
virbr0 8000.525400b863cb yes virbr0-nic
vnet1

‍

[root@kvm1 images]# virsh domiflist testkvm2
接口 类型 源 型号 MAC


vnet0 bridge br0 rtl8139 52:54:00:23:8a:38

2.3 镜像管理

2.3.1 磁盘模式

根据存储数据方式的不同可以分为两种格式,一种是稀疏模式、一种是全镜像模式,全镜像模式无法做快照,

IO层面是有qemu模拟的,CPU和内存是由KVM实现的。

raw:

指定多大就创建多大,直接占用指定大小的空间:
			
老牌的格式了,性能上来说的话还是不错的。由于原生的裸格式,不支持snapshot。在虚拟机迁移方面还是有很大的限制。  

qcow2:

是openstack默认也是比较推荐的格式,将差异保存在一个文件,文件比较小而且做快照也比较小,空间是动态增长的.
			
现在比较主流的一种虚拟化镜像格式,支持快照功能。

qemu支持的磁盘种类:

Supported formats: vvfat vpc vmdk vhdx vdi ssh sheepdog rbd raw host_cdrom host_floppy host_device file qed qcow2 qcow parallels nbd iscsi gluster dmg tftp ftps ftp https http cloop bochs blkverify blkdebug

2.3.2 功能实践 基本语法

创建磁盘

qemu-img create [-q] [-f fmt] [-o options] filename [size]

查看某个具体磁盘格式的帮助信息:

qemu-img create -f qcow2 -o ? file.qcow

查看磁盘
qemu-img info 磁盘名称

磁盘转换

qemu-img convert -f 原格式 旧磁盘名称 -o 转换后格式 新磁盘名称

1
2
qemu-img create -f raw /opt/rocky.raw 1G
qemu-img create -f qcow2 -o backing_file=/kvm/images/hmk.img test-1.qcow2 2G

2.3.3 磁盘格式转换

raw磁盘转换qcow2 ,注意:正在使用的磁盘无法转换

1
qemu-img convert -f raw test.raw -O qcow2 test_convert.qcow2

2.3.4 克隆

kvm 虚拟机的克隆分为两种情况:

(1) KVM主机本机虚拟机直接克隆
			
(2) 通过复制配置文件与磁盘文件的虚拟机复制克隆(适用于异机的静态迁移)

命令

镜像克隆

virt-clone -o <被克隆的虚拟机名称> -n <生成的虚拟机名称> -f <新的磁盘文件>

virt-clone -o <被克隆的虚拟机名称> –auto-clone

2.4 资源管理

	在虚拟机不关机的情况下,对CPU进行调整操作叫热调整。它是在Redhat7.0以后才出现的功能,所以要使用这功能,那必须要求KVM宿主机和虚拟机规格必须一致,而且在7.0+版本。
				
	目前cpu热调整命令,只能增加,不能减少,想要减少的话,可以进入虚拟机中,关闭某个使用的CPU即可。

公有云为什么不支持cpu热调整

1、因为客户创建的虚拟机类型不一致,不满足热添加和热删除的前提条件,所以为了管理的方便就统一不允许了

2、因为创建虚拟机会有个调度的问题,创建的虚拟机的命令,会将创建的虚拟机调度到某一台宿主机上,具体调度到哪台宿主机上,没有办法保证,由于受宿主机的配置影响,所以热添加和热删除的功能没有办法保证

2.4.1 常见命令

1
2
3
4
# virsh setvcpus <虚拟机名称> <cpu个数> --live
# 注意:
# 默认后面会有--live属性,标识热调整,默认不会更改后端的配置
# 如果更改后端的配置,需要使用--config

cpu绑定

virsh vcpuin <虚拟机名称> <虚拟机CPU号> <宿主机CPU号>

cpu重置

virsh shutdown <虚拟机名称>

virsh start <虚拟机名称>

[root@kvm1 libvirt]# cat /sys/devices/system/cpu/cpu0/online
1
[root@kvm1 libvirt]# cat /sys/devices/system/cpu/cpu1/online
1
[root@kvm1 libvirt]# cat /sys/devices/system/cpu/cpu2/online
1
[root@kvm1 libvirt]# cat /sys/devices/system/cpu/cpu3/online

virsh edit testkvm

1

编辑虚拟机配置

‍

4

注意:

意思就是,当前的cpu可以动态调整,当前的cpu个数为1,可调整的最大个数为4

经过测试,我的虚拟机可以支持255个,但是最大只能设置253个。

如果操作异常,有可能导致以下异常情况

error: operation failed: Failed to query numad for the advisory nodeset

修改为(例如:最大4核,当前1核):

4

‍

‍

[root@kvm1 libvirt]# virsh dominfo testkvm
Id: 1
Name: testkvm
UUID: 964ea7ee-0b60-42ab-9707-c9eda7f7f4f8
OS Type: hvm
State: running
CPU(s): 1
CPU time: 45.5s
Max memory: 1048576 KiB
Used memory: 1048576 KiB
Persistent: yes
Autostart: enable
Managed save: no
Security model: none
Security DOI: 0

[root@kvm1 libvirt]# virsh vcpuinfo testkvm
VCPU: 0
CPU: 0
State: running
CPU time: 38.3s
CPU Affinity: yyyy

CPU关系的值:

如果是 y,表示该虚拟 CPU 可以在对应的物理 CPU 核心上运行;如果是 n,则表示不可以。

上面有 8 个 y,说明这个虚拟 CPU 可以在系统中的所有 8 个物理 CPU 核心上运行,也就是说它与所有 8 个物理 CPU 核心都具有亲和性,调度程序可以根据系统负载等情况将这个虚拟 CPU 的任务分配到这8 个核心中的任意一个上执行。

[root@kvm1 libvirt]# virsh setvcpus testkvm 4

[root@kvm1 libvirt]# virsh vcpuinfo testkvm
VCPU: 0
CPU: 0
State: running
CPU time: 23.6s
CPU Affinity: yyyy

VCPU: 1
CPU: 1
State: running
CPU time: 0.1s
CPU Affinity: yyyy

VCPU: 2
CPU: 0
State: running
CPU time: 0.1s
CPU Affinity: yyyy

VCPU: 3
CPU: 0
State: running
CPU time: 0.1s
CPU Affinity: yyyy

cpu 绑定

kvm 的0号 cpu绑定在宿主机的1号cpu上

virsh vcpuin testkvm 0 1

内存调整

立刻生效

virsh qemu-monitor-command <虚拟机名称> –hmp –cmd

命令:
			
查看说有信息 info
			
查看内存 info balloon
			
调整内存 ballon 定制容量
			
特点:
			
	只管调整,不管系统是否重启成功

重启生效

virsh setmem <虚拟机调整> 定制容量

注意:
			
	涉及到虚拟机的重新加载(重启),如果内存过小,导致系统无法启动。
			
	频繁执行虚拟机可能卡死

资源超配 超限使用

原则上,宿主机的资源是不允许超限使用的,比如,我要在 100G的电脑上,存储 200G的资源。这是不可能的。

根据我们之前对虚拟磁盘的原理解析,我们知道,分配的资源和使用的资源是有区别的,实际使用的远远小于分配的资源。所以我们在分配内存的时候,可以对内存进行超配的使用

调整内存

查看内存信息

[root@kvm1 libvirt]# virsh qemu-monitor-command testkvm –hmp –cmd info balloon
balloon: actual=1024
调整内存信息

[root@kvm1 libvirt]# virsh qemu-monitor-command testkvm –hmp –cmd balloon 512

[root@kvm1 libvirt]# virsh qemu-monitor-command testkvm –hmp –cmd info balloon
balloon: actual=512

[root@kvm1 libvirt]# virsh dumpxml testkvm | grep -i mem
1048576
524288


[root@kvm1 libvirt]# virsh dominfo testkvm | grep -E ‘mem’
Max memory: 1048576 KiB
Used memory: 524288 KiB

在存在最大内存的前提下,是无法调整到限制之外的

调整最大限制

调整内存限制

virsh edit testkvm

3170304

1048576

调整了内存的最大值为3G,当前的内存大小为1G

重启后生效

2.5 创建windows主机

‍

2.5.1 virtio 定位

在KVM中创建Windows虚拟机时,virtio是一套由Red Hat开发的开源虚拟化驱动程序和设备规范,主要作用是优化虚拟机和宿主机之间的I/O 性能,解决传统虚拟化中“模拟设备”效率低下的问题。

KVM 作为Type-II虚拟化技术,宿主机内核直接提供虚拟化支持。但Windows系统默认没有针对KVM的原生驱动。

	若不是用VirtIO,虚拟机只能通过KVM模拟的"标准硬件设备"如intel E100网卡、IDE硬盘控制器等与宿主机交互,这些模拟设备的兼容性好,但性能差(模拟过程会消耗大量CPU资源,且IO延迟高)

VirtIO 采用半虚拟化 模式

宿主机提供专门大的VirtIO虚拟设备,如virtio 网卡、virtio 块设备
			
虚拟机中安装virtio 驱动后,可直接与宿主机的VirtIO设备通信,跳过冗余的硬件模拟环节,大幅提升磁盘I/O、网络传输等性能(尤其是高负载的情况)

Windows 系统默认不包含KVM虚拟设备的驱动,若直接在KVM中安装Windows,可能出现磁盘无法识别、网卡无法识别等问题,virtio为windows虚拟机提供了多种虚拟设备驱动,从而解决了Windows 对KVM的兼容性问题。

VirtIO块设备驱动:

优化虚拟机磁盘(如 QCOW2、RAW 镜像)的读写性能,替代传统的 IDE/SATA 模拟驱动。

VirtIO 网卡驱动:

提升网络吞吐量和响应速度,替代 E1000 等模拟网卡驱动。

VirtIO 气球驱动(Balloon):

实现虚拟机内存的动态分配(宿主机可根据需求调整虚拟机的实际内存占用)。

VirtIO 控制台驱动:

支持虚拟机与宿主机的控制台交互(类似串口通信)。

在 KVM 中部署 Windows 时,几乎都会使用 VirtIO 驱动(需在安装系统时手动加载),否则会面临性能瓶颈或设备无法识别的问题。

‍

[root@kvm1 ~]# virt-install –os-variant=win7 –virt-type=kvm –name win7 –memory 2048 –vcpus=2 –cdrom=/data/images/cn_windows_7_ultimate_with_sp1_x64_dvd_u_677408.iso –network=bridge=br0,model=virtio –graphics vnc,listen=0.0.0.0 –noautoconsole –disk path=/opt/win7.qcow2,size=20,bus=virtio,format=qcow2 –disk path=/data/images/virtio-win-0.1.171.iso,device=cdrom

‍

Share 

 Next post: 测试 

© 2026 Hekang

Theme Typography by Makito

Proudly published with Hexo